| Home Page
Network Basics
LAN Topologies
OSI Model
Physical Hardware Layer
Connecting up Networks
Configuring a LAN
Windows 2000 Essentials
Windows 2000 Practical Notes
Installing Windows 2000 Server
Installing Active Directory
Adding New Users
Favorite Links
Contact Page
|
To install Windows 2000 Server follow these steps:
1. Change computers boot sequence to boot from CD.
2. Place Win2K Server CD in CD-ROM drive & reboot. You will see a blue screen, at the bottom of this screen there will be a line stating 'Setup is loading files' It is simply inspecting your hardware and loading drivers and other files required.
3. After file loading process is complete you will see another blue screen 'Setup Notification' press Enter to continue installing Server.
4. The next blue screen will ask you to select a partition in which to install your server on. Select a partition to install on and press Enter.
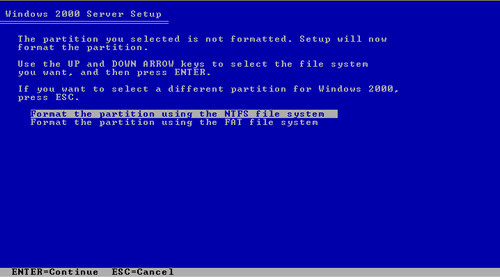
Next you will see a blue screen with the following options: NTFS & FAT. (see screen below)
|

* NTFS is strongly recommended especially if you plan on using Active Directory Services and file-level permissions. If you need to access Windows 2000 Files from a FAT based operating system, you should consider using FAT.
5. Select a file system and press Enter to continue.
6. Next screen will show the setup program coping files to your hard drive. This may take a while.
7. Once copying of files is complete the system will prompt you to reboot, which will bring us to the installation process.
8. The first screen you will see after your computer reboots will have Microsoft screen with a progress bar at the bottom that tracks the startup progress. Once the bar reaches the end the setup will continue.
9. Welcome wizard screen will appear press Next to continue.
10. Wizard will start installing the hardware contained on your machine such as Plug&Play hardware etc. Be warned this part can take a long time.
11. After Wizard completes installing your hardware a 'Regional Settings' screen will appear. Change settings as required eg. English Australian, press Next button to continue.
12. A 'Personalize Your Software' screen will appear asking for a name and an organisation, type in details and press Next to continue.
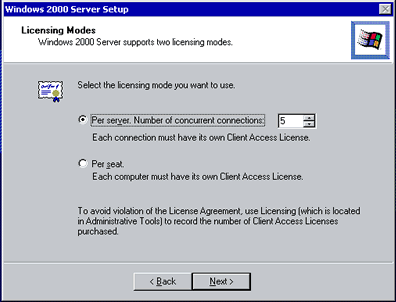
13. Depending on the version of Windows 2000 Server you are installing the next screen may ask you for the product key, if you are prompted for it enter product key and continue. You will then be taken to the 'Licensing Modes' screen (see screen below). Select a licensing mode & type in the number of connections, then press Next to continue.
|

14. Next screen will ask you for a Computer Name and Administration Password. Type in details and press Next to continue.
15. Next screen will ask you for components, utilities, services & tools you wish to install. You can choose to customise or select the default installation. It's best if you go ahead with the default at this stage to minimise the chance of anything going wrong. You can always install these components later on. Press Next button to continue.
16. Next screen will ask you to adjust the Date & time, do so and press Next to continue.
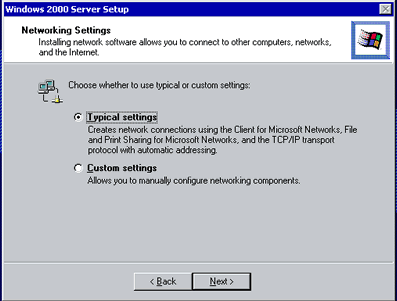
17. Next will window will be 'Network Settings' window, in which Windows will try to detect and install all network components such as NIC and Protocols. Once it has detected them it will ask you whether you want a Typical network installation or to Customise your network settings manually (see screen blow). Select best options suitable and press Next to continue.
|

18. Next screen will ask you whether your computer will be part of a Workgroup or a Domain. Select the first option (Workgroup) if you want to install the server on a network without a domain or if it isn't on a network at all. Select the second option (member of Domain) if your computer is to be a member of an existing domain. You must type in a Workgroup or a Domain name in the white box before you press the Next button to continue.
19. Next screen will show windows installing the components and settings you've chosen, this may also take a while.
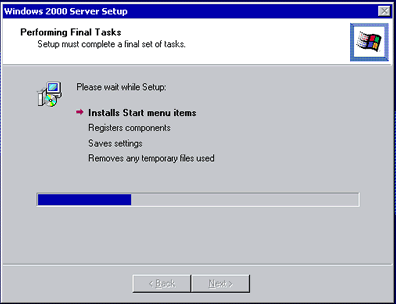
20. The last window will show you the Wizard installing start Menu Items, registers components etc (see screen below). This part may also take a long time. After the wizard completes this process, the wizards Finish menu will pop up select Next button to restart your computer.
|

21. When computer boots, Windows will load normally and will eventually reach the logon screen, Enter the Administrator's password. |
|
|
|
|
|
|
|

